Saturday, September 18, 2010

I'm Back! It's been too long.

It's been about four months since I last posted - wow! Things have been super busy and I haven't been able to find time to scrap. I finally started to work on stuff again last week so hopefully I'll be able to continue finding time and posting some projects.


Today I made a few cards using some old paper scraps that I had, and some other odd and ends. It was fun to experiment with those left over pieces we all end up with.


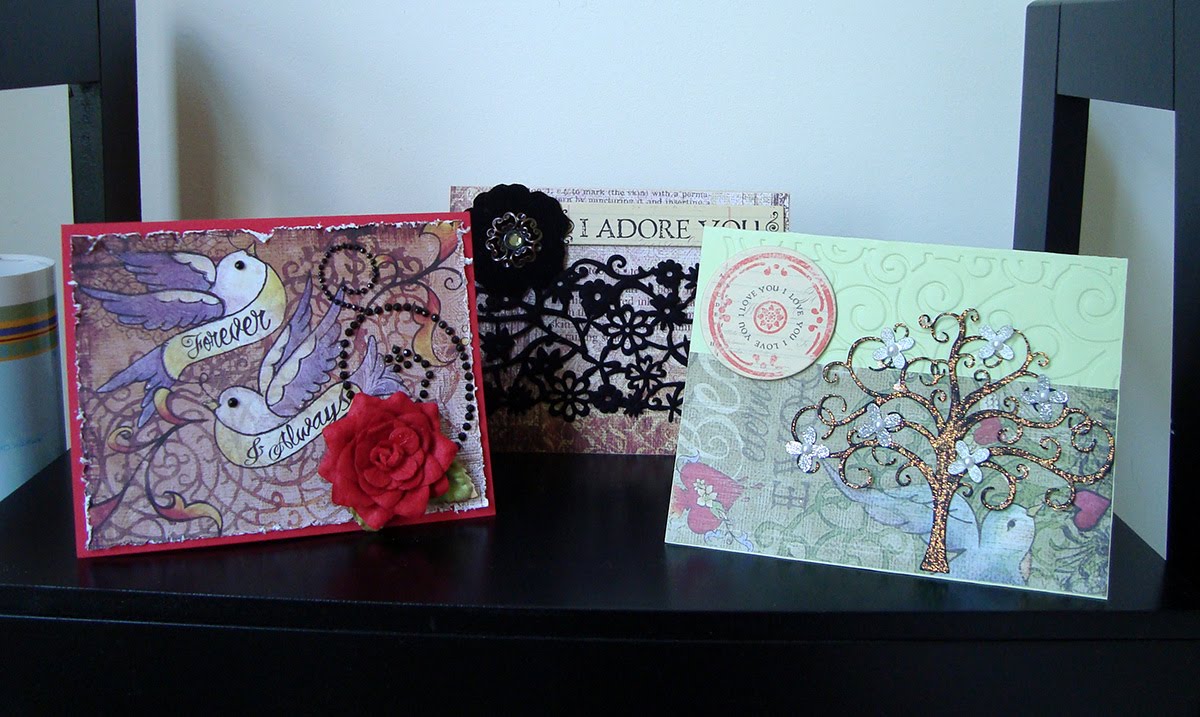
The "I Adore You" card was pretty simple to make. It's a scrap of patterned paper with a Prima flower and some felt lace I found in the dollar bin at Michael's. I used spray adhesive to attach the felt lace to the card. The "I Adore You" quote is a cardstock sticker I found at the Scrapbook Expo last year!


The one again was a scrap of paper that I took my distress tool to. I love using the distress tool on the grungy-looking paper, it just works so well. Then I added another leftover Prima flower and some bling that I had laying around. I also used some rock candy Stickles on the bird's wing, but it really doesn't show up in the picture.


This last one I used my Cuttlebug to emboss the cardstock of the card. I wanted to echo the curves of the tree I used. The tree was cut out with my Silhoutte, and then I covered it with gold/green Stickles (don't remember the color right off hand). I added some little flowers I had left over from another project. The "I Love You" circle is another cardstock sticker that was in the same set as the "I Adore You" one. It's amazing what you can find for a dollar at the Expo when you look!

So that is the start to my weekend and not a bad way to start! What are you working on this weekend? Any special projects?

Sunday, May 2, 2010

NSD Recap

Hope everyone had a fun day scrapping yesterday! I had a great time and got quite a few things done. I spent pretty much the whole day at my desk yesterday and it's been so long since I've been able to do that. What an awesome day!


I wanted to share some of the cards I made. Mother's day is coming up so I needed to get those cards made and also my mom's birthday is tomorrow. So let's start with mom's card.

I used the Mariposa paper again for this card and metal making memories butterflies. I wanted the butterflies to be a bit more sparkly so I added stickles to the raised areas.


Now for the Mother's Day cards. The first one I used different colors of distress inks and a Hero Arts "stamp stitches" stamp to create the background. The title words I cut out with my silhouette and the fuzzy turtle and butterfly are Sassafras felties. Those are so adorable, I love using them!


The next card I used some left over Bo Bunny Love Bandit papers that I had from Valentine's Day. I cut out the heart with my silhouette and then added some bling. If you're wondering, I used spray adhesive to attach the heart. It works great for those intricate things that are too large to put through my little Xyron.


The last Mother's Day card I made was for my aunt. She doesn't have any children, but she has dogs and they are her babies! And really, don't all pet parents deserve cards too? I think so. Anyway, I used some cute puppy embossing folders on my cuttlebug and a postage stamp die to make the three puppy shapes on the left. The background is also emboss with a script folder. Then I just added some cute chipboard letters. I wanted to continue the phrase on the inside of the card so it says "Love" on the front and then "You." on the inside. I love how this turned out.


Here's the inside of the card.


So how was your National Scrapbook Day? Did you get a lot accomplished? Did you have a great time? Send me some links to your projects, I'd love to check them out!

Saturday, May 1, 2010

Happy National Scrapbook Day!

Hi everyone! Sorry I've been away for a while. I got busy with life and we all know how that goes!

Anyway, I hope everyone is enjoying NSD. I wanted to go ahead and post this layout I did today. I will be posting again tomorrow some of my other creations of the day. But here's this one brought on by a challenge over at scrapbook.com.


Here's a close up of the words on the page. I'm really happy with this one. I used the Mariposa DCWV paper, which I love and also the Mariposa chipboard accents. The "relax" is a K&Company diecut and the little metal butterfly is making memories. Then some black rhinestones for bling.

Friday, March 19, 2010

Your Birthday It Is, Yes!


Today's project is a card I made for a good friend's birthday. My main tools were my Silhouette SD and my trusty Xyron 1.5 Sticker Maker. I also used some Star Wars stickers that I found at Target and had to get for this project. I love how cartoony they look!

So I cut out the "Happy Birthday" text and the stars and circles with the Silhouette. Then with a few of the stars and one circle, I used a clear embossing stamp pad and holographic embossing powder. I really love the way the holographic powder looks on the black cardstock. I ran all the elements, the text and shapes through the Xyron. I love that little thing, it is so useful for attaching those little elements you cut out! I also used the Antique Photo distress ink pad on the edges of the card for a little character.

My Friend loves Starbucks so we got him a gift card. I attached it to the inside of the card using clear photo corners. Great for holding gift cards!


For the inside message I found a Star Wars quote that I thought was appropriate and I used my laser printer to print the message out on cardstock. Then I used my distress ink again on the edges of the cardstock for character. One of the stickers of Luke finished off the inside of the card. I was really happy with how this one turned out and my friend loved it too! That always makes you feel good!

So everyone have a great scrappy weekend! May the force be with you!

Sunday, March 14, 2010

Making Page Kits

So this week I don't have an actual project to post because I have been working on making page kits. I got this idea from another blogger, I wish I had saved the link but I must have forgotten. I have so little time to scrap during the week and when I read about this method I thought it would help me get more done when I'm short on time. I spend so much time wondering where to start! So these page kits eliminate that. For these I ordered 12.5x12.5 cellophane bags off of ebay. I got a set of 100 bags for about $19 shipped. These are basically the same bags that you get class kits in at Archiver's. So in each bag I put patterned paper, colored card stock if I plan on using it, any special die cuts or embellies, and the photos I know I want to use with this paper. I'm not putting the neutral card stock in the kits, I'll have that separate. Each kit I have enough stuff to do anywhere from one to four pages. I figure this will speed up my scrapping during the week, when I have little time, and also make it easy for me to grab and go to crops.


So this is what my floor looks like right now! ha ha. I've got all my stacks out, and that's another thing I like. This makes me go through my paper stash and use what I have! I'm also making page kits for cards kits. Other things you can include in your kits - sketches if you have something in mind, you can go ahead and cut your titles out on your silhouette or cricut and put those in the kits, you can include notes for your journaling, whatever makes your life easier!
So that's it for this week! I'm going to continue putting my kits together until I can see my floor again! Hope everybody has a great week! And thanks to everybody following me now and leaving comments! I love you guys!

Monday, March 8, 2010

Basic Grey Lemonade Card Swap


This first project I wanted to share, is of a set of cards I made for my friend, Calia Yang. You can check out her blog here!

For this card set I used the Basic Grey Lemonade paper line, which is beautiful! For the embellies, I used Prima Pink Hydrangeas and TPC Studio Boho Blooms embellies. I also used some gems from K&Company.

For the "Follow your Bliss" card, I used my cuttlebug to emboss the script onto the bottom piece of cardstock. I really love that embossing folder!

For the "Smile" card I used holographic embossing powder for the butterfly on blue cardstock. It looks a lot better in person - it's so hard to capture that sparkle on camera! I also added a few 3d butterfly embellies to pull the card together.

For the "Live, Laugh, Love" card, I experimented with some Tim Holtz distress inks on the cardstock. The colors I used were blue china, peeled paint, and antique photo. Then I used my trusty old edge distress tool on the patterned paper. Then I added the swirl of pearls which I think just made the card.

The "Precious" card was fun to make. I used an adhesive shape from The Stamping Station and glass beads to make the heart. For the background, I cut up strips of the different patterned paper for kind of a quilt like look.

The "Carefree" card was the first that I made in this set and I love the bright blue on it. I used my cuttlebug here again and embossed the swirls on the back piece of cardstock. Very simple card, but oh so pretty!

Thanks so much for stopping by and checking out this project! I'm hoping to be able to put up more soon, so be sure to come back soon!

Saturday, March 6, 2010

Finally!

Welcome to my brand new blog! After much time wondering when I would ever have time for such a thing and always really wanting to start one, I finally broke down and took the plunge. So here it is! I will start posting projects soon, and my goal is to at least update this once a week. I'm also hoping this will motivate me to participate in some more contests. So welcome! I hope you'll come back to check out my work soon!